Friday, February 28, 2014
5 Simple Water Saving Tips for California’s Drought
Across social media platforms, California has been dubbed the “LOL” state of the country, referring to our perpetually perfect weather, while the rest of the United States grapples with snow storms and Polar Vortexes. Our more-than-sunny disposition, however, is no laughing matter for the Golden State. (Although it’s difficult to avoid chuckling at hashtags like #SolarVortex in reference to our state’s uncharacteristic 70-degree weather this January). 2013 was the driest year on record in California, motivating Gov. Jerry Brown to declare a statewide drought emergency last week. And that means Californians are now being asked to voluntarily cut our water usage by 20%.
Coldwell Banker Residential Brokerage in California pulled together a few simple steps we can take, right now, to aid in the preservation of the precious and limited reserves we have during this time of crisis. Here are some indoor tips provided by the Metropolitan Water District of Southern California and the Family of Southern California Water Agencies:
1. Wash only full loads of laundry and dishes. Instituting this very simple policy of half-full-dishwashers-no-more can lead to water savings of up to 50 gallons per week. Makes sense.
2. Fix household leaks promptly. On average, homes across America can create water waste of up to 10,000 gallons a year due to dripping faucets, running toilets and other types of leaks. Many public water utility agencies offer free in-home analysis of leak detection and water-saving equipment, including low-flow shower heads and faucet aerators, as an initiative to help residents in water conservation efforts. Check with your local water authority for information and opportunities to become water-wise.
3. Spend only five minutes in the shower. This may be one of the easiest yet challenging methods of conserving our precious resource of water. That long, hot, steamy shower can cost you up to eight gallons! In addition to installing a low-flow showerhead, there is also help for trimming the length of a shower to five minutes-the shower timer! Many products are out there on the market to choose-from the very basic to more elaborately designed models, literally, with bells and whistles. No quarters necessary.
4. Turn off the water while brushing your teeth. Tick-tock-tick-tock-approximately 2.5 gallons per minute are circling the drain while you’re scrubbing your pearly whites. A matter of mindfulness and creating a new habit. They say that only takes 21 days-consider a note on the bathroom mirror until the practice “sinks in.”
5. Install the latest water-saving equipment, like high-efficiency toilets and clothes washers. There may be a rebate program in effect to offset the cost of purchase, so check with the public water authority in your area. It’s worth a look.
Tuesday, February 25, 2014
3 Questions to Ask Before Buying a Home
by The KCM Crew on January 20, 2014 in For Buyers
1.20 VisualIf you are thinking about purchasing a home right now, you are surely getting a lot of advice. Though your friends and family have your best interests at heart, they may not be fully aware of your needs and what is currently happening in real estate. Let’s look at whether or not now is actually a good time for you to buy a home.
There are three questions you should ask before purchasing in today’s market:
1. Why am I buying a home in the first place?
This truly is the most important question to answer. Forget the finances for a minute. Why did you even begin to consider purchasing a home? For most, the reason has nothing to do with finances. A study by the Joint Center for Housing Studies at Harvard University reveals that the four major reasons people buy a home have nothing to do with money:
A good place to raise children and for them to get a good education
A place where you and your family feel safe
More space for you and your family
Control of the space
What non-financial benefits will you and your family derive from owning a home? The answer to that question should be the biggest reason you decide to purchase or not.
2. Where are home values headed?
When looking at future housing values, we like the Home Price Expectation Survey. Every quarter, Pulsenomics surveys a nationwide panel of over one hundred economists, real estate experts and investment & market strategists about where prices are headed over the next five years. They then average the projections of all 100+ experts into a single number.
Here is what the experts projected in the latest survey:
Home values will appreciate by 4.3% in 2014.
The cumulative appreciation will be 28% by 2018.
Even the experts making up the most bearish quartile of the survey still are projecting a cumulative appreciation of
over 16.8% by 2018.
3. Where are mortgage interest rates headed?
A buyer must be concerned about more than just prices. The ‘long term cost’ of a home can be dramatically impacted by an increase in mortgage rates.
The Mortgage Bankers Association (MBA), the National Association of Realtors, Fannie Mae and Freddie Mac have all projected that mortgage interest rates will increase by approximately one full percentage over the next twelve months.
Bottom Line
Only you and your family can know for certain the right time to purchase a home. Answering these questions will help you make that decision.
Friday, February 21, 2014
How to Dry Concrete Floors
by Kristy Robinson, Demand Media
Use a propane torch to dry garage or patio floors quickly.
Concrete slab floors take up to 90 days to fully cure, or harden and dry. Unfortunately, that means waiting to install a new, more attractive floor, which is not what most builders or homeowners want. Moisture in the floor, even if there’s no standing water, interferes with the adhesion of glue and mortar products. Luckily, there are things you can do to speed up the process. These same techniques work well if you’ve had a flood or moisture seeping into a basement and want to prevent mold from developing.
1. Sweep the floor to remove all dust and debris where no standing water is present. Scrape up excess adhesive or other matter on the floor that can hold moisture or catch fire.
2. Vacuum up standing water from the floor with a wet vac. Empty the wet vac before it becomes full to prevent the water from coming back out or the machine becoming too heavy to lift. Dump the water away from the foundation of your home so that it doesn’t seep back in.
3. Raise the temperature in the room as high as possible. A temperature of 90 degrees is preferred to add energy to the excess water in the slab enabling faster curing. Place a humidifier in the room and set it to lower the humidity to 10 percent.
4. Tape a piece of plastic sheeting to the floor tightly. Leave the room closed off for three days, and then come back and test underneath the plastic with a dew point hygrometer. This tool tells you the humidity level of the concrete. Compare the humidity level with the tile or carpet adhesive manufacturers’ guidelines to determine if the moisture level is low enough for installation of the product.
5. Put on long pants, a long sleeve shirt and heat-resistant gloves. Remove all flammable obstacles from the room.
6. Assemble the propane torch parts, inspecting each to make sure there is no damage and no o-rings are missing. Connect the torch assembly to a 20-pound propane tank according to manufacturers’ directions. Place the propane tank in the center of the room for maximum mobility.
7. Test the torch for any leaks by shutting off the torch adjustment valve and opening the supply valve on the tank. Tighten or replace any parts of the torch assembly where there is a leak. Close the shut-off valve on the tank and open the torch adjustment valve after testing to release any gas in the torch.
8. Close the torch adjustment valve and leave it for 30 seconds. Open the shut-off valve on the tank slowly. Point the torch away from the tank and turn the adjustment valve just until you hear gas escaping. Hold the igniter near the end of the torch and strike it to light the torch.
9. Hold the torch so that the flame is 6-inches off the concrete floor. Wave the torch from left to right slowly over a small area. Keep the torch moving and walk slowly to a new area as you complete one portion of the floor.
10. Shut off the tank supply valve. Disconnect the torch assembly from the tank and leave it to cool before storing.
Things You Will Need
Broom
Scraper
Wet vac
Humidifier
Long pants
Long sleeve shirt
Heat-resistant gloves
Propane torch
20-pound propane tank
Tips
Only use a propane torch approved for indoor operation.
Warnings
Propane torches provide up to 3000 degrees of instant heat. Use extreme caution when working with the torch and follow all manufacturers’ safety guidelines to avoid injury.
Propane torches are not recommended for use in enclosed spaces due to the inability of the propane tank to withstand temperatures above 120. The heat from the torch raises the temperature in the room above that level quickly.
Tuesday, February 18, 2014
Loan Demand Back on the Upswing
Daily Real Estate News | Wednesday, January 22, 2014
After reaching a 13-year low at the end of last year, mortgage applications were back on the rise last week, the Mortgage Bankers Association reports.
Mortgage applications, which include those for refinancing and home purchases, rose 4.7 percent on a seasonally adjusted basis for the week ending Jan. 17. Broken out, demand for applications for refinancings increased 10 percent over the prior week, while applications for home purchases, viewed as a future gauge of home buying, dropped 4 percent, the MBA reports.
The MBA’s mortgage application index had posted its lowest level in about 13 years at the end of last year, when the Federal Reserve announced it would be tapering its $85 billion per month bond-buying program in the new year.
However, for the last two weeks, mortgage rates have been declining. The average rate on 30-year fixed-rate mortgages fell from 4.66 percent to 4.57 percent last week, MBA reports. That marks the lowest average for 30-year rates since this past November, according to the MBA.
Source: “U.S. Mortgage Applications Rose 4.7% Last Week,” The Wall Street Journal (Jan. 22, 2014)
Friday, February 14, 2014
Builders Hike Their Prices
Daily Real Estate News | Wednesday, January 22, 2014
More builders are reporting they’re raising their prices on new homes. Twenty-four percent of 231 builders recently surveyed say they raised their prices in December, which is an increase over a 19 percent low reported in November, according to John Burns Real Estate Consulting Inc. data. The percentage of builders who say they lowered their prices fell to 8 percent in December, after a 12 percent high in October.
“The pricing environment notably improved,” Jody Kahn, a senior vice president at Burns, told The Wall Street Journal. “It’s still not back to where we were earlier in [2013] with builders raising prices aggressively.”
In early 2013, more than half of the builders surveyed had reported raising their prices, with some markets, such as California and Arizona, even posting double-digit increases from 2012 levels. But prices curtailed during a slowdown in the summer months as interest rates rose.
Lately, however, interest rates have mostly remained flat — around 4.4 percent to 4.5 percent averages — and improving employment numbers have builders feeling more confident again.
Average new-home prices reached an all-time high of $340,300 in November, according to the U.S. Census Bureau.
Michael Gapen, senior U.S. economist at Barclays, predicts that home prices will rise 7 to 8 percent this year adding to last year’s gains of 11 to 12 percent.
Buyers “know that builders tend to make price increases at the first of the year,” says Gene Swang, a division president for David Weekley Homes. “I think customers are concerned that if they didn’t get a home under contract [in December], they’d see higher prices in another month.”
Source: “Santa’s Gift to Builders: Higher Home Prices,” The Wall Street Journal (Jan. 21, 2014)
Wednesday, February 12, 2014
San Carlos Made The Top 10 Cities to Live in In California!
I have lived in San Carlos now for 25 years. It has a small town feel, great schools, a vibrant downtown, and yet is close to three metropolitan areas and international airports making it a great location for jobs and travel. Who could ask for more?
www.movoto.com/ca/best-places-in-california/
www.movoto.com/ca/best-places-in-california/
Tuesday, February 11, 2014
Defend the Trend: Are Mixed Metals Classy or Too Brassy?
by Briana Mowrey January 10, 2014
BRIANA: It’s 2014, which means we’ve got a whole new class of trends to defend…or not. One look that stood out on House Beautiful’s 2014 design trends list was mixed metallics. Our own Brian Patrick Flynn played with different shades of gold in a recent office makeover. So, what do you think? Have you taken a shine to mixing silver and gold or do you think metals should stay solo?
 MARIANNE: I am all for it. I don’t decorate with silver or chrome much but I love to mix warm metallics like gold, copper, and brass. I mean, get a load of this glamour kitchen from designer Jean Louis Deniot. Hubba hubba:
 CAMILLE: Metallics are neutrals, so it’s always okay to mix them.
HANNAH SLAUGHTER: I like mixing metals but tend to stick to small groups of accessories. If you’re going to do it in a whole room, you better have the money to a) pay to do it with the top notch stuff and b) change it – metallics look dated so quickly.
GRANT: I can’t mix metals. A while back, I was looking around my house when something horrifying came into focus — all the hardware was different! Kitchen knobs were silver, chandelier was gold — doorknobs to outside were nickel, while interior door hardware was brassy gold. How I missed this for so long is beyond me. But once the issue was on my radar, I couldn’t get that mess corrected fast enough. From doorknobs to door hinges to ceiling fan pulls to cabinetry hardware, everything is now nickel — and I am at peace.
ALYSSA: I’ve mixed metals with my jewelry, so I say it translates just as well to home design.
KAYLA: Same here, Alyssa. And considering my home is one big room, it’s impossible for me to not mix metals. So I’m hoping I get a resounding “do it!” from the team.
NANCY FIRE, Design Director of HGTV HOME: I’m all about the mix. It works in our HGTV HOME Heavy Metal trend story and [we're] getting great feedback from on-air response. Also, anything that BPF does looks fab!!
!
KERI: Metallics are my jam. I love any and all of them. I love the industrial look, and I feel like you can’t achieve that without mixing your metals. It’s fun and a lot less stuffy than an all gold or silver space.
ALYSSA: Kayla — I feel like Keri’s answer is actually what you wanted to hear. (re: industrial)
FARIMA: I’m all about gold, but I love mixing too. You really can’t go wrong with shiny!
NANCY FIRE, Design Director of HGTV HOME: I am at Heimtextil in Germany and they are all over industrial mixes with metallic. It looks hip and NOT tacky at all…updated and very cool!!
- See more at: http://blog.hgtv.com/design/2014/01/10/mixed-metals-trend/#sthash.69zSCVP3.dpuf
CAMILLE: Metallics are neutrals, so it’s always okay to mix them.
HANNAH SLAUGHTER: I like mixing metals but tend to stick to small groups of accessories. If you’re going to do it in a whole room, you better have the money to a) pay to do it with the top notch stuff and b) change it – metallics look dated so quickly.
GRANT: I can’t mix metals. A while back, I was looking around my house when something horrifying came into focus — all the hardware was different! Kitchen knobs were silver, chandelier was gold — doorknobs to outside were nickel, while interior door hardware was brassy gold. How I missed this for so long is beyond me. But once the issue was on my radar, I couldn’t get that mess corrected fast enough. From doorknobs to door hinges to ceiling fan pulls to cabinetry hardware, everything is now nickel — and I am at peace.
ALYSSA: I’ve mixed metals with my jewelry, so I say it translates just as well to home design.
KAYLA: Same here, Alyssa. And considering my home is one big room, it’s impossible for me to not mix metals. So I’m hoping I get a resounding “do it!” from the team.
NANCY FIRE, Design Director of HGTV HOME: I’m all about the mix. It works in our HGTV HOME Heavy Metal trend story and [we're] getting great feedback from on-air response. Also, anything that BPF does looks fab!!
!
KERI: Metallics are my jam. I love any and all of them. I love the industrial look, and I feel like you can’t achieve that without mixing your metals. It’s fun and a lot less stuffy than an all gold or silver space.
ALYSSA: Kayla — I feel like Keri’s answer is actually what you wanted to hear. (re: industrial)
FARIMA: I’m all about gold, but I love mixing too. You really can’t go wrong with shiny!
NANCY FIRE, Design Director of HGTV HOME: I am at Heimtextil in Germany and they are all over industrial mixes with metallic. It looks hip and NOT tacky at all…updated and very cool!!
- See more at: http://blog.hgtv.com/design/2014/01/10/mixed-metals-trend/#sthash.69zSCVP3.dpuf


Friday, February 7, 2014
Boomerang Buyers Flying Back
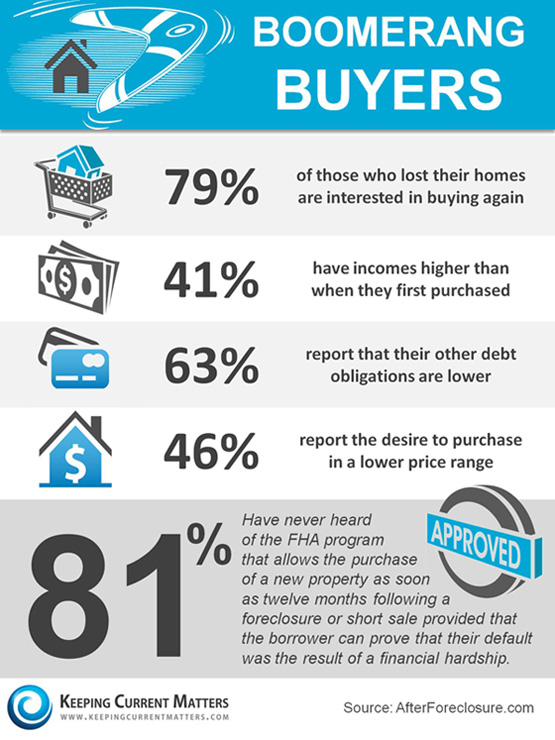
Note: “Boomerang buyers” are former homeowners who have gone through a short sale, foreclosure, or bankruptcy in the past few years and are saving up for a down payment to purchase a home again.
https://www.customerlobby.com/reviews/159/the-clarke-team/
Tuesday, February 4, 2014
How to Make the Most of a Tiny Kitchen

Smart ways our food editor maximized space in her tiny kitchen
Our food editor loves to cook but doesn't have much space to do it
in. Here's how she reorganized things to make the most of her small
kitchen.
Issue #1: Not enough counter space
Counter space is a precious commodity in any kitchen, but particularly in a small one. Without enough room to spread out, cooking can quickly devolve into a stressful nightmare. To free up more counter space, I installed a long, wall-mounted magnetic knife strip, thus eliminating the need for a space-hogging knife block. The magnetic strip also more easily accommodated my eclectic collection of knives (3 chef's knives, 3 paring, 2 serrated, 1 extra long slicer, 1 cleaver, 1 boning knife, and more) that would never fit in one block anyway. If you have small kids, place the knife strip high enough so it's out of their reach or storing your knives in a drawer, if you have one to spare.
Issue #2: Too many unused tools out on the counter
To pick what I stored on my counter vs. stashed in the drawer, I just had to sit down and viciously weed out tools that I don't use on a daily basis. I wanted to go from three crocks on my counter for holding cooking utensils to two. Potato masher and balloon whisk? In the drawer you go! Wooden spoons and tongs? Stay right where you are. Everybody's list of regular-use tools will be slightly different, so you have to decide for yourself which ones are your countertop essentials.
Issue #3: Limited access to pots and pans
I have so many pots and pans and I love and use them all. But my cookware hoarding meant I also had to store pots stacked in tall towers two rows deep under my kitchen sink. This made it difficult (and loud!) to access all but the ones at the tops of the front-most stacks. When I replaced all the cabinets in my kitchen, I knew I wanted to install at least a couple of deep, wide drawers to hold short stacks of my pots. Now my cookware is super easy to identify and reach. We have similar drawers at the Good Housekeeping Test Kitchen and they are fantastic. For my skillets, I installed metal shelving from which we hang them in a neat little row -- now they're both part of the décor and within easy reach.
Issue #4: Using the oven as storage
Like many who live in a typical, New York City apartment, I use my oven for storage (pans, cookie sheets, etc.), but it made it such a hassle every time I wanted to, you know, actually use my oven. This meant being ruthless once more and actually getting rid of never-used/broken items, like that thermal lunchbox someone gave me 5 years ago, storage containers with no lids, and some splintered bamboo placemats. With a little purging, shifting, and rearranging, everything I really need has its space and my oven is free and clear any time I need to roast or bake.
Issue #5: Hard to get into lower cabinets
I was so excited when my deep cabinets were installed. Extra storage space, huzzah! The ones that were drawers worked beautifully, but we quickly realized that it would be impossible to access the things located in the back of the shelf-only, lower cabinets; at least not without crouching and pulling everything out. Been there, done that, and hated it. We toyed with the idea of plastic bins/baskets, but those were impractical and hard to organize. Instead, we found these great roll-out metal racks that screw into your cabinet/shelf. They come in sizes/shapes to accommodate both larger items like food processors and mixers, as well as lids. I was able to install these in less than an hour with only a drill and a little determination.
Subscribe to:
Posts (Atom)
